
On December 1st I partook in an introductory session for Adobe After Effects. We where about an hour into the session when it was unexpectedly cut short due to the severe snow. Today we were able to finish that first session. As someone who has never used the programme before in my life, nor any other that deals with moving image, I was a complete novice. I tried to take as many notes as possible, that way if anything were to trouble me in the future I would hopefully have the answer written down somewhere. Below are scans of the notes I took; they cover everything from how to create a new composition to how to successfully export and render it.


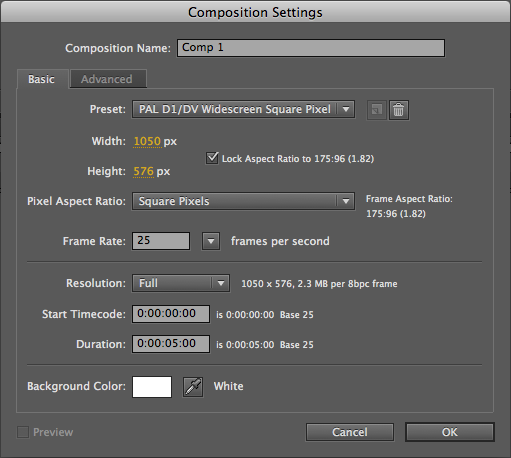
Below is a screenshot af all the settings I need to create the correct sized and formatted document for my 'Silent Movie' brief. The most important aspects in this dialogue box are the preset which needs to be; PAL D1/DV Widescreen Square Pixel, the pixel aspect ratio which should be square pixels and the duration of the composition, which in our case is five seconds or 0:00:05:00.
After experimentation with the programme we where introduced to key frames and the important functions which they control. Below is a screen shot of my timeline window which shows that I had three individual layers, all different colours, and these layers all have the same actions at exactly the same time.

When ready to save the document it is important that you click the composition header and then add to render queue. This will then reveal to you three more option in the timeline window. You should individually click each of these to ensure that you are saving the right type of document in the right place. The first one will be render settings and the only thing that needs checking is the time span box, which should be adjusted accordingly.

The next thing to check is the output module settings. In here the format quicktime is already selected so that is correct, however the format options should be changed to H.264. This is similar to saving an image as a jpeg as it compresses the file but still remains high quality. Once these things are altered you can click output to where you can rename and save your video.

No comments:
Post a Comment